SHOP
Jim Hill

Jim Hill


Recent posts by Jim Hill

1 min read

This is what the HP MJF technology is designed to do

By Jim Hill on Jun 15, 2020 4:04:45 PM

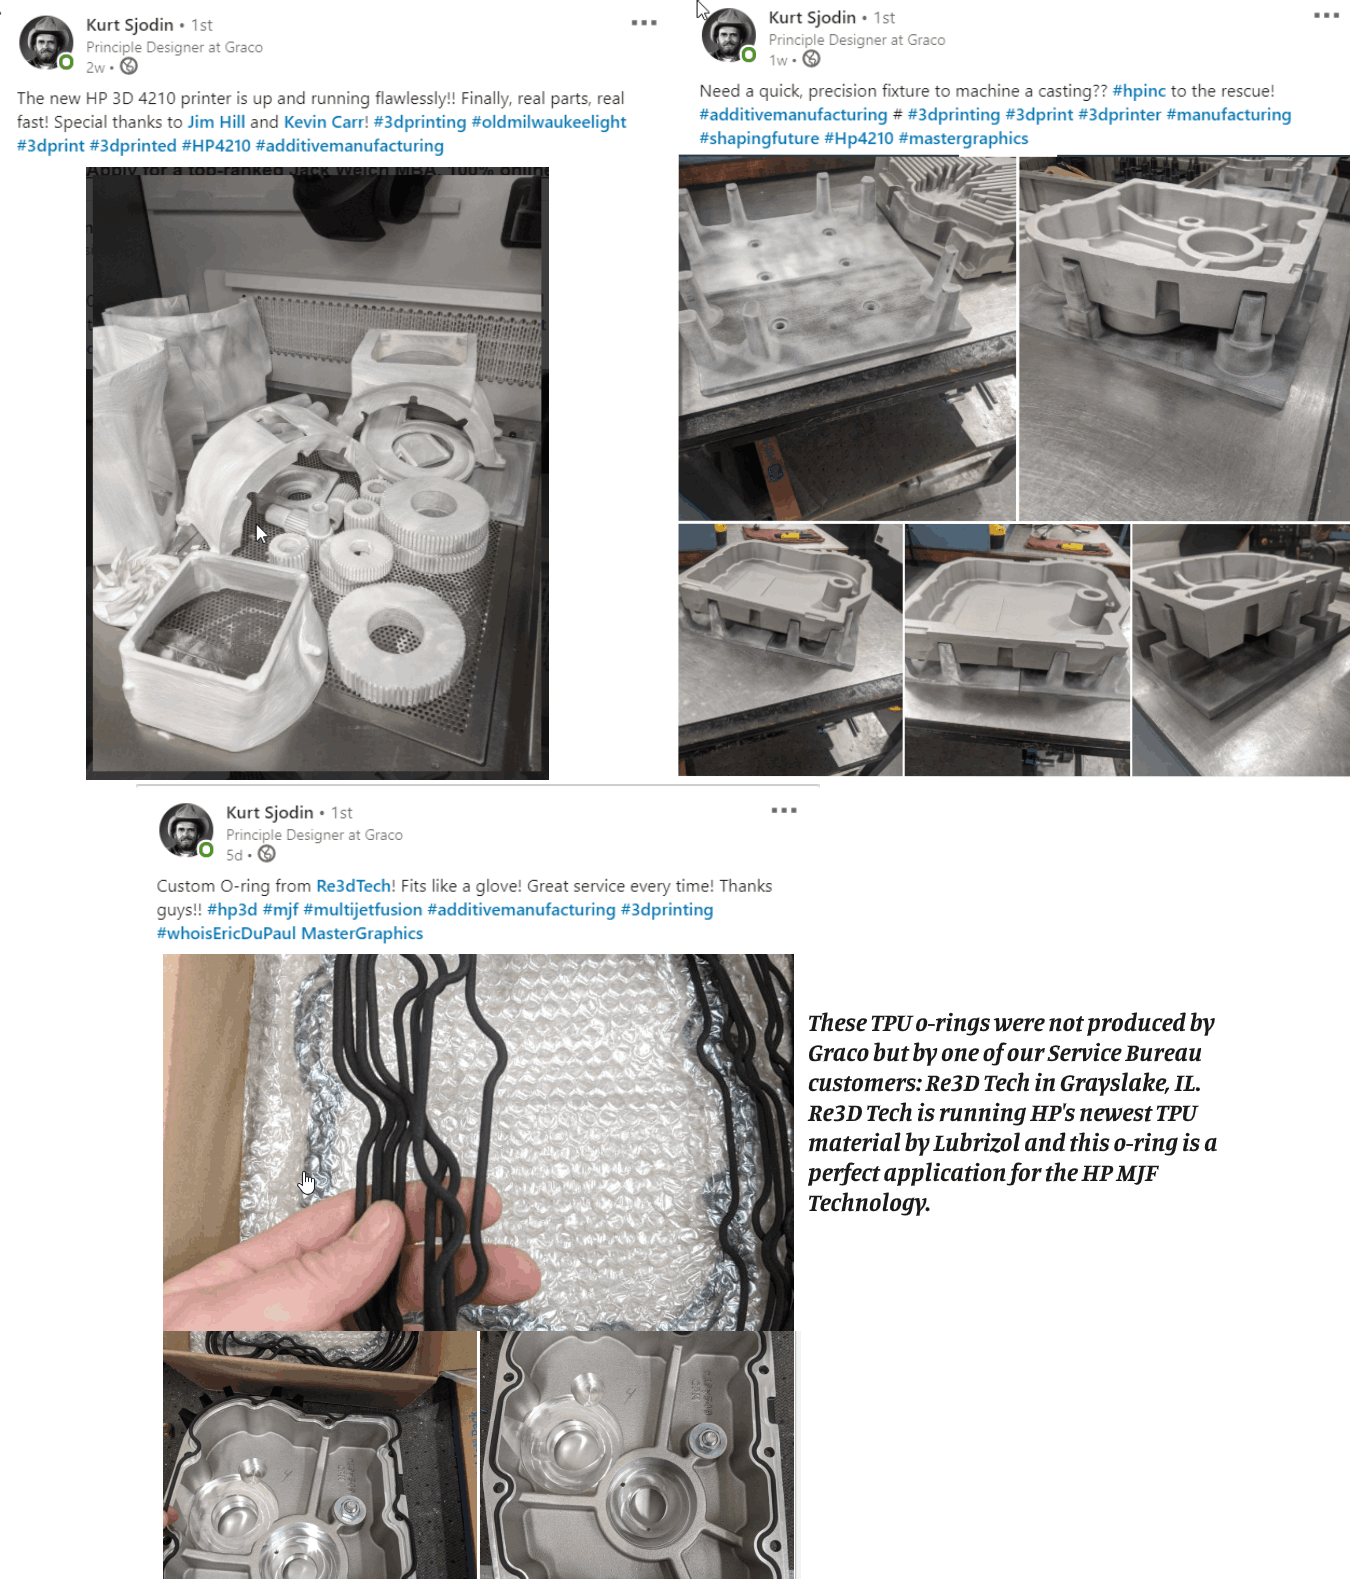
One of MasterGraphics' most recent HP 3D customers is graco logo in Minneapolis, MN.  We worked with Graco to add MJF 3D print technology to their arsenal of CNC and machining applications.  They did have 1 large FDM machine but it could not even come close to the capability of their new HP 4210 3D printer.  Kurt Sjodin of Graco is overjoyed at the types of parts being produced on Graco's new addition. 

graco1

Here are some recent Linkedin posts that show just some of the applications Graco found for their newest addition to the already state of the art manufacturing plant.  As someone once said "A picture can say a thousand words." Gracolinkedinposts


We have been in the Additive Manufacturing space for 12 years and help our clients understand and effectively implement 3D print.  We look to address the following challenges:

  • Improve Innovation
  • Accelerate Product Development
  • Reduce Costs

Not sure if any of those challenges exist for you? We realize most of the people we talk to don't have an immediate application - however, I believe it's critical to be aware of groundbreaking technology and plan for its impact.

We specialize in HP 3D print technology but also know when different technologies are a better fit and are not afraid to say that we don't have an equipment fit.

Check out two of our previous blogs to understand how we see the market and how HP technology works. 

MG: How HP MJF 3D Printing Works
MG: Why Additive Manufacturing is Unstoppable

Let's setup a call, I promise to keep the conversation short, to the point and worthwhile. Let me know what is a good time and date to connect and I will schedule a call.

Thank you,

Jim Hill 
3D Account Manager


Topics: 3D Printing
2 min read

Why is additive manufacturing unstoppable?

By Jim Hill on Feb 10, 2020 2:42:14 PM

As additive manufacturing technologies have advanced, 3D printed parts have moved decidedly outside the Research and Development arena and onto the production line. These pivotal processes are developing and producing concepts previously unattainable in the manufacturing world.

Entrepreneurs to Fortune 500 companies and large OEM’s have embraced the advanced enterprise of 3D printing to meet their tough performance standards and requirements. As companies have designed for additive manufacturing and utilized it as a compliment to traditional manufacturing, new applications have come to the scene and changed what’s possible.

There are four industries in particular where the amazing capabilities of additive manufacturing have transformed production:

1. Aerospace
Aerospace companies were some of the first to adopt additive manufacturing. Some of the toughest industry performance standards exist in this realm, requiring parts to hold up in harsh conditions. Engineers designing and manufacturing for commercial and military aerospace platforms need flight-worthy components made from high-performance materials.

Common applications include environmental control systems (ECS) ducting, custom cosmetic aircraft interior components, rocket engines components, combustor liners, tooling for composites, oil and fuel tanks and UAV components.

3D printing delivers complex, consolidated parts with high strength. Less material and consolidated designs result in overall weight reduction – one of the most important factors in manufacturing for aerospace.

2. Medical

The rapidly innovating medical industry is utilizing additive manufacturing solutions to deliver breakthroughs to doctors, patients and research institutions. Medical manufacturers are utilizing the wide range of high-strength and biocompatible 3D printing materials, from rigid to flexible and opaque to transparent, to customize designs like never before.

From functional prototypes and true-to-life anatomical models to surgical grade components, additive manufacturing is opening the door to unforeseen advancements for life-saving devices. Some applications shaking up the medical industry are orthopedic implant devices, dental devices, pre-surgery models from CT scans, custom saw and drill guides, enclosures and specialized instrumentation.

3. Energy

Success in the energy sector hinges on the ability to quickly develop tailored, mission-critical components that can withstand extreme conditions. Additive manufacturing’s advancements in producing efficient, on-demand, lightweight components and environmentally friendly materials provides answers for diverse requirements and field functions.

Some key applications that have emerged from the gas, oil and energy industries include rotors, stators, turbine nozzles, down-hole tool components and models, fluid/water flow analysis, flow meter parts, mud motor models, pressure gauge pieces, control-valve components and pump manifolds.

4. Consumer Products

For designers, graphic artists and marketing teams, the time it takes to form an idea and deliver it to the market is everything. Part of that time is simulating the look and feel of the final product during design reviews to prove ideas to key stakeholders. Consumer product manufacturers have embraced 3D printing to help develop iterations and quickly adjust design.

3D printing is great for producing detailed consumer electronics early in the product development life cycle with realistic aesthetics and functionality. Sporting goods have benefited from early iterations delivered quickly and with fine details. Other successful applications include entertainment props and costumes, lightweight models and sets, and finely detailed architectural models.

As 3D printing technology advances in speed and build volume, more consumer products may turn to additive manufacturing for their large volume demands.

Topics: 3D Printing
2 min read

What is an HP DFAM event? Should you attend?

By Jim Hill on Oct 2, 2019 12:26:12 PM

Not only is HP changing Additive Manufacturing with their print technology but also in their approach to advance the utilization of 3D print within manufacturing.  HP has a unique perspective since they have built their reputation on top quality and innovative equipment and they are sharing their knowledge on how to leverage 3D print from design all the way to manufacturing.  This series is designed to help companies understand how they can move from prototyping to production using 3D print.  HP currently uses Additive Manufacturing to produce final use parts and have cost justified and proven out the economics.  It must also be noted, after I have attended a number of these sessions, the concepts and training provided are applicable to other 3D print technologies such as SLS and Carbon.  I assure you it’s truly a great educational session.  


Click the link below to watch this YouTube video on what DFAM is.

https://youtu.be/uBBxGiBI6qU

dfam

Some highlights of what you will learn:

  • How and why HP decided to leverage MJF 3D printing technology to manufacture over 140 function parts used in each of our new MJF 500/300 series 3D printers vs. injection molding.
  • How to identify and select the right applications for additive manufacturing across your product lifecycle.
  • Training on the fundamentals of effective design for MJF.
  • How the process works and design strategies for MJF process optimization.
  • How the materials behave and what to consider when designing for each of them.
  • The new design paradigms that are enabled by additive manufacturing and the required mindset change.
  • How to design for value maximization (process and cost).
  • Training on the fundamentals of effective design for MJF.
  • Live Design for Additive Manufacturing (DfAM) demo and application examples to inspire you.

You are always welcome to stay after the scheduled presentations and discussions to consult with technical experts from HP 3D Printing on your own parts.   That could be the most valuable part of the session is the post conversation on your specific challenges and if 3D print makes sense to utilize. 

Feel free to reach out to me to find the next HP DFAM event in your area.

Jim Hill
3D Account Manager
3701 Algonquin Rd, Ste 780
Rolling Meadows, IL 60008
847.704.4029 Direct
800.873.7238 Toll-free
JIm.hill@mastergraphics.com
www.mastergraphics.com


Topics: 3D Printing
1 min read

Why are companies buying HP 3D printers to replace their existing 3D printers?

By Jim Hill on Oct 2, 2019 11:33:12 AM

I started working in 3D printing in 2012 and have visited a lot of companies that are using some type of a 3D print process.  I have seen a lot of companies using simple FDM printers for basic prototypes, SLA printers for very detailed parts, larger FDM printers for basic prototypes and fixtures, Ployjet printers for basic detailed prototypes, color jet printers for gypsum powder based prototypes, and SLS printers to get strong prototype parts.  The one thing in common with these above 3D print technologies is that each is a tracing technology.  Tracing technology can only go so fast.  The more detailed the part the slower the process.  I have talked to a lot of people about how long a build can take on a tracing system like FDM and it can take a week to produce a large part. Who has time for that?

HP’s one pass power bed system can produce parts at an inch per hour with a bed size on the 4200 of 13” x 11.5” x 15”.  You can produce hundreds of parts in a full build that will only take 15 hours versus days on the above systems.

Now you know why companies are looking at HP 3D printing!

Need more speed? The new 5200 HP printer can actually run a full build with the same bed size as the 4200 in 11.5 hours.  Need manufacturing standards?  The parts produced on this 5200 printer actually meet a CPK level of 1.33 on I.T. scale of 13.   What does that mean?  It was explained to me by an HP applications Engineer that parts now coming off the 5200 printer are equivalent to injection molded parts coming off soft steel tooling. 

We haven’t even discussed the reduction in material cost to produce parts.  I can tell you that our customers are seeing actual part costs of $3 to $4 per cubic inch of part.  This includes materials, fusing and detailing agents, and all consumables need throughout the year.

To get an idea how your parts could fit into an HP 3D print technology feel free to contact me and we setup a time for me visit your facility, see your part applications, discuss your expectations and setup a process to see if HP 3D printing is right for you.

Topics: 3D Printing
3 min read

What is the process for the installation of an HP 3D printer?

By Jim Hill on Oct 2, 2019 9:15:54 AM

I was given a task of writing content for our company blog and the requirements for adding content to the blog are simple, use my day to day experience in 3D printing to share some of the common questions I get on a daily basis.

We have sold a lot of HP 3D printers since we started this journey a few years ago, and one of the most common questions I get on a routine basis is what is the process for delivering and installing an HP 3D printer.

It is a great question and one that requires detailed information to answer.

Purchasing an HP 3D printer can be a quick process but often takes substantial time to get through with the various evaluation and purchasing steps.  This purchasing process can be a whole other topic for another blog. For this blog, let’s assume you have chosen an HP system. 

The first thing we do is go through an in depth pre-site survey with our customers. HP has put this together with a lot of thought and design for not only on how the unit will be used but for servicing as well.  The purpose for the pre-site survey is make sure there are no surprises in the delivery through installation process.

In the pre-site survey there are detailed instructions on things such as delivery plans, uncrating, needed electrical connections, installation expectation by our dedicated service team, etc….

I have been a part of almost all of the installations and I have to admit the pre-site survey covers it all This must be signed by the customer before shipment takes place as this ensures a successful delivery and install. 

What are some of the items on the site survey?

First we need to know is how to get the printer off the truck.  Does the customer facility have a loading dock with a fork lift?  We also need extended forks to remove a crate the size of a small car from a 48-foot truck- this is not a small printer!  We of course will supply this forklift if needed.

Typically, four crates arrive at the customer facility within 3 weeks from the date of the purchase order as well as many boxes and a pallet of material.

We coordinate the delivery date to our customer’s facility and our service manager schedules the installation date around this.  We make sure all items needed for the installation are where they need to be.

We make sure the spot where the printer will be located is in a clean dry location that has a consistent temperature, free from contaminants from other manufacturing processes such as oil and vibrations from stamping presses.

Time to uncrate and begin the setup.  I can honestly say HP does a very detailed job of crating the machines.  These items are bolted down and can take several hours to uncrate. Once uncrated we roll the units into position in the plant.

We instruct the customer of the electrical requirements ahead of time so that they can have an electrician perform the electrical hookup and air required for the post processing station.

Usually at least 2 people from our service group arrive to perform the installation.  It is the mission of our service group to make sure the printer will build parts to HP’s set specifications as well as train the customer’s personnel on best practices.  The training is a very detailed process.

The initial training includes basic printer maintenance and operation of HP’s Smart Stream.  Smart Stream is the HP software that allows the customer to create print builds that you can send to the printer. 

The one thing I have learned about the training is that the amount of training is dependent on what the customer needs and we can adapt the steps accordingly.  However, I have found that normally the installation takes at least a full week. 

That initial training is not all that is included.  HP has realized that additional training is needed beyond basic usage.  The first week of training is basic but this a production unit – clients need to understand best practices.  HP added another training step called “Ramp Up training” which us unique to the industry.  Ramp up training is scheduled by the customer about a month after installation of the printer.  It is designed to make sure the customer fully understands the printer and all of its features.  This is effective because at this time you have a better understanding of the capabilities of the printer and more aware of the needs or questions you may have. 

During the first few weeks of running the printer I have seen a lot of customers able to build basic parts but the ramp up feature is a huge help in fully utilizing the new HP printer.

Installation of the printer is not the only thing we cover in that first week. During the purchasing process we recommend and sell a vacuum system for cleaning the work area and a bead blast post processing station.  Our service group makes sure the customer fully understands the vacuum system and its operation as well as how to properly bead blast parts to remove any excess powder.

In a large nutshell that is the installation process for an HP printer and rest assured HP has transformed training around 3D printing along with their revolutionary technology.  The printer acquisition is just the start, ongoing training and technician support are the real keys to success. 

Topics: 3D Printing
3 min read

Is there a post cure for HP’s Multi Jet Fusion (MJF) parts?

By Jim Hill on Oct 1, 2019 4:23:44 PM

Having been in the 3D print industry since 2012, I have sold various types of 3D print processes including SLA, SLS, FDM, Polyjet, and CJP.  Post processing is one of the key topics clients need to understand.

When I have the initial conversation about HP’s MJF technology, one of the first questions I get from experience engineers who have worked with 3D printing is often about the post curing and processing of parts that is needed.

As a background, let’s go through some of the common 3D technologies and the post processing required.  Then I will go through the HP Multi Jet Fusion process and its unique post processing requirements.

Beginning with SLA:   Most engineers are familiar with SLA since it started 3D printed and are aware the SLA process uses a laser to cure photo curable polymers in a vat.  After the build is complete, the parts are then cleaned using alcohol to remove remaining liquid material that was not hardened.  Support structures are needed for printing and often at this point they are removed either by breaking them off or using tools to remove.  The parts are then post cured in a UV oven for a period of time to ensure the part is fully hardened now that the excess material has been cleaned off.  Finally,  the parts can then be hand sanded, painted, or plated or provide the final finish.

SLS:  The SLS process uses a laser and a powder bed system.  The laser traces the part into a bed of powder.  The printer lays down one thin layer at a time, traces the parts as needed for the layer wit the laser, and continues this process until the build is finished.  The support material for the SLS process is the powder itself which eliminates the need of removing any support material.  Since the process uses heat to actually melt the material, the parts need to cool over a period of time.  After the cool down process, parts can be removed and any remaining powder is cleaned using a bead blast system.  The SLS parts can then be sanded and/or infiltrated to improve density and then painted if needed.

FDM: FDM is a tracing technology using various types of extruded materials from a spool.  Often you have one spool of part material and one spool of support material.  After the FDM printer has finished you must remove the support material used in the build process.  This can be done by hand or using pliers depending on the how small or dense the support structure needs to be.  Hand sanding often is done now to remove any of the remaining support attachment points or to ensure a smooth surface.  In many cases, the parts are washed with a caustic material to smooth the layer lines that are apparent due to the process steps.

Polyjet:  In my opinion, Polyjet is by far the messiest 3D print technology when it comes to post processing. This a printing process that uses an industrial print head to jet material versus extrude like FDM and has some advantages such as speed and surface finish.  However, once the part is printed you must place the part into a part washing system to remove the support material versus breaking off like FDM.  The support material is literally a blob that must be washed out.  It has many challenges such as the melt material is caustic and if not careful fine detail on the parts can be washed away during this process.

CJP:  Color jet printing is a process that uses a liquid binder jetted into a bed powder bed.  The powder is actually gypsum.  Since you are jetting a liquid you can actually add color to the parts as you print them.   The parts, full color even, are printed in a “green” state and must be moved from the printer very carefully since they are not fully solidified.  You must clean the excess powder off and very carefull infiltrate the part with super glue to make the parts firm.  Even though solidified, these parts are fragile. 

Having worked with all of these technologies before HP introduced the Multijet fusion technology I was very curious to see how this HP process stacked up.  Most people don’t spend enough time understanding post processing before they implement technology.  I knew this had to be an area HP addressed to improves usability. 

MJF:  First of all I must note, MJF parts are not chemically bonded, they are actually fused parts melted with a combination of agents and heat.  HP jets fusing agents into a powder bed system much in layer process like SLS, but then instead of a laser used to melt the powder a heating lamp applies the needed heat.  The proprietary fusing agent actually intensifies the heat from the lamps to actually melt the material and melts up to that3 layers deep to create parts are almost 100% as strong in the Z axis as in the X and Y axis.  Another result of using fusing agents is a very dense part.  No infiltrating need to make the parts dense.

Post processing for the MJF parts is a quick bead blast in a cabinet using common glass beads. This is the real advancement from HP – the post process improvement.  Once completed the parts can be dyed, painted, and plated if needed. There is no post cure needed, no infiltrating to make the parts dense or support structure removal since the powder is the support structure.

Topics: 3D Printing Post-Processing
7 min read

What are the primary 3D print plastic technologies?

By Jim Hill on Sep 6, 2019 12:14:21 PM

What are the primary 3D plastic print technologies available and how does HP’s new multi jet fusion technology stack up?

Having worked in the 3D print industry in a part sales role and equipment sales role for 7 years, I have been asked many times by engineers and non-engineers what are the technologies used for 3D printing plastic type objects and what materials are used. Most recently, many people also ask me about HP’s technology since they are the largest player ever to enter the 3D print market.

In my opinion, the immediate challenge I see for newcomers to 3D printing is distinguishing between the different processes and materials available.

It can be pretty confusing. There are many different acronyms so the first thing to understand is that 3D printing is actually an umbrella term that encompasses a group of different 3D printing processes. It’s important to first understand the various technologies.

In this post we are going to look at what each primary type of 3D printing is such as: SLA, FDM, SLS, DLP, Material jetting and the newest technology MJF by HP.

SLA: Stereolithography Apparatus
I am beginning with this technology since SLA holds the historical distinction of being the world’s first 3D printing technology.  Chuck Hull is the inventor of SLA (1986) and founded 3D Systems one of the largest players in 3D printing. On a side note, I have had the pleasure of meeting Chuck Hull on several occasions and have to admit he is the humblest person I have ever met considering he is credited with starting the whole 3D print industry. 

I will try to put things in laymen’s terms, but this is a technical industry so there will be some technical terms and explanations used.

An SLA printer uses mirrors known as galvanometers or galvos, with one positioned on the X-axis and another on the Y-axis. These galvos rapidly aim a laser beam across a vat of resin, selectively curing and solidifying a cross-section of the object inside this build area, building it up layer by layer.

When the process starts, the laser “draws” the first layer of the print into the photosensitive resin. Wherever the laser hits, the liquid solidifies. The laser is directed to the appropriate coordinates by a computer-controlled mirror.

At this point, it’s worth mentioning that most desktop SLA printers work upside-down. That is, the laser is pointed up to the build platform, which starts low and is incrementally raised.

After the first layer, the platform is raised according to the layer thickness (typically about 0.1 mm) and the additional resin is allowed to flow below the already-printed portion. The laser then solidifies the next cross-section, and the process is repeated until the whole part is complete. The resin that is not touched by the laser remains in the vat and can be reused.

Post-Processing

After finishing the material polymerization, the platform rises out of the tank and the excess resin is drained. At the end of the process, the model is removed from the platform, washed of excess resin, and then placed in a UV oven for final curing. Post-print curing enables objects to reach the highest possible strength and become more stable.


FDM: Fused Deposition Modeling
This is also known generically as material extrusion and these devices are the most commonly available — and the cheapest — types of 3D printing technology in the world.

The way it works is that a spool of filament is loaded into the 3D printer and fed through to a printer nozzle in the extrusion head. The printer nozzle is heated to a desired temperature, whereupon a motor pushes the filament through the heated nozzle, causing it to melt.

The printer then moves the extrusion head along specified coordinates, laying down the molten material onto the build plate where it cools down and solidifies.

Once a layer is complete, the printer proceeds to lay down another layer. This process of printing cross-sections is repeated, building layer-upon-layer, until the object is fully formed.

Depending on the geometry of the object, it is sometimes necessary to add support structures, for example if a model has steep overhanging parts.


SLS:  Selective Laser Sintering or Powder Bed Fusion
Powder Bed Fusion is a 3D printing process where a thermal energy source will selectively induce fusion between powder particles inside a build area to create a solid object.

Many Powder Bed Fusion devices also employ a mechanism for applying and smoothing powder simultaneous to an object being fabricated, so that the final item is encased and supported in unused powder.

Creating an object with Powder Bed Fusion technology and polymer powder is generally known as Selective Laser Sintering (SLS).

How it works, again I am going to get technical.

First, a bin of polymer powder is heated to a temperature just below the polymer’s melting point. Next, a recoating blade or wiper deposits a very thin layer of the powdered material — typically 0.1 mm thick — onto a build platform.

A CO2 laser beam then begins to scan the surface. The laser will selectively sinter the powder and solidify a cross-section of the object. Just like SLA, the laser is focused on the correct location by a pair of galvos.

When the entire cross-section is scanned, the build platform will move down one-layer thickness in height. The recoating blade deposits a fresh layer of powder on top of the recently scanned layer, and the laser will sinter the next cross-section of the object onto the previously solidified cross-sections.

These steps are repeated until all objects are fully manufactured. Powder which hasn’t been sintered remains in place to support the object that has, which eliminates the need for support structures.


DLP: Digital Light Processing
Looking at Digital Light Processing machines, these types of 3D printing technology are almost the same as SLA. The key difference is that DLP uses a digital light projector to flash a single image of each layer all at once (or multiple flashes for larger parts).

Because the projector is a digital screen, the image of each layer is composed of square pixels, resulting in a layer formed from small rectangular blocks called voxels.

DLP can achieve faster print times compared to SLA. That’s because an entire layer is exposed all at once, rather than tracing the cross-sectional area with the point of a laser.

Light is projected onto the resin using light-emitting diode (LED) screens or a UV light source (lamp) that is directed to the build surface by a Digital Micro Mirror Device (DMD).

A DMD is an array of micro-mirrors that control where light is projected and generate the light-pattern on the build surface.


MJ: Material Jetting (commonly known also as Polyjet)
Material Jetting (MJ) works in a similar way to a standard inkjet printer. The key difference is that, instead of printing a single layer of ink, multiple layers are built upon each other to create a solid part.

The print head jets hundreds of tiny droplets of photopolymer and then cures/solidifies them using an ultraviolet (UV) light. After one layer has been deposited and cured, the build platform is lowered down one-layer thickness and the process is repeated to build up a 3D object.

MJ is different from other types of 3D printing technology that deposit, sinter or cure build material using point-wise deposition. Instead of using a single point to follow a path which outlines the cross-sectional area of a layer, MJ machines deposit build material in a rapid, line-wise fashion.

The advantage of line-wise deposition is that MJ printers are able to fabricate multiple objects in a single line with no impact on build speed. So long as models are correctly arranged, and the space within each build line is optimized, MJ is able to produce parts at a speedier pace than other types of 3D printer.

Objects made with MJ require support, which are printed simultaneously during the build from a dissolvable material that’s removed during the post-processing stage. MJ is one of the only types of 3D printing technology to offer objects made from multi-material printing and full-color.


MJF:    Multi Jet Fusion Technology
MJF does laser based powder bed printing one better and it’s a natural move for HP to improve on powder based printing with its heavy-duty 2D printing know-how. The new process has the speed and technologies of a printing press, as its print head and heater arms sweep across the full print area for each layer of the part.

Like binder jetting, MJF uses inkjet printing to define part geometry, but then it diverges in how it fuses the powder into a part. Each fraction of a millimeter layer is created with three steps:

  1. A layer of powder is spread across the bed.
  2. Inkjet print heads sweep across the powder, depositing millions of drops of light-absorbing ink called fusing agents. These define which voxels to keep and which will fall away as powder. Additional inks called detailing agents help mark a crisp part boundary and can provide other properties, including color.
  3. An infrared heater sweeps across the bed. The ink-marked areas absorb enough of the IR energy to sinter to the underlying part, and the rest remains as full-color powder.

I have to admit having been in the industry since 2012, MJF is my personal favorite technology because it answers so many manufacturing needs from prototyping to production. It was introduced to the market about 3 years ago by Hewlett-Packard.  MJF is helping company’s cut their time to market and reduce product development costs.  Often it’s also utilized to reduce tooling cost.  No other technology offers the array or various advantages to that of MJF.

What are some of HP’s MJF Advantaged?

  • Builds on the advantages of powder bed 3D printing for industrial use.
  • Offers the lowest part cost of any 3D printing technology.
  • Produces high-quality parts.
  • Eliminates manual steps and scales for small production runs.
  • Offers the flexibility of fusion and detailing agents to add new material properties.
  • Brings the name recognition and manufacturing clout of HP to 3D printing.
  • Introduces HP’s Open Platform for new material certification.

MJF is already supported by a range of printers. This includes the color-capable HP 300/500 series as well as the production-scale 4200 printer.  Recently HP introduced the injection mold quality 5200 series 3D printer. Lastly, with HP’s recent release of a binder jetting metal printer (Metal Jet) they are making it clear that MJF is part of larger HP strategy for additive manufacturing. The era of supposed 3D printing hype is over… the additive era of manufacturing is here.

Given that these machines are targeted at industries, it’s not unusual that you wouldn’t have access to one.  However, HP’s initial success has been with 3D print service providers who may offer what you need to get your production going.  Often a first step is to utilize a service provider before implementing a unit in house. 

The above are just some of the reasons why I believe HP’s MJF technology is my personal favorite 3D print technology.


Topics: 3D Printing
2 min read

Is HP changing the world of 3D printing?

By Jim Hill on Aug 30, 2019 3:27:45 PM

To answer this question, I have to go back a few years when they first entered the Additive Manufacturing space.  I was working in the 3D print arena for a different 3D print manufacturer during the spring of 2016 when rumors were rampant of HP getting into the 3D print industry. The industry was speculating two things – one that they were going to buy an existing 3D print technology company or two they would develop their own 3D print technology based off of existing technologies. In the end, they actually developed their own new technology to take the 3D printer a huge step forward. The technology is known as Multi Jet Fusion (MJF).  During a large 3D print related trade show (rapid+tct), HP introduced MJF on a series of YouTube videos showing the process at work.  Did it cause a stir at rapid+tct?  The answer is yes it certainly did. And this from an industry that has seen its share of over hyped technologies.  It’s also important to remember the core technologies at the time were FDM, SLA, SLS and a few other jetting based technologies.  The common theme with all 3D print technologies at the time was one off, tracing type processes that produced good detailed parts but lacked the ability to run volume. 

Here is where HP changed the world of 3D printing: They had developed a process using a power bed system (eliminates support structures) using fusing agents to produce final use nylon parts (true fused and functional parts).   Although the powder bed concept was not new, several manufacturers were already using a powder bed system (namely SLS Selective Laser Sintering), the significant difference is HP is not using a laser.  Remember, as I mentioned before, the SLS process utilizes a laser tracing technology to solidify parts.  The laser can only go so fast – throughput is limited.   HP utilizes a one pass fusing system that jets fusing agents to form the parts in layers. The jetting agents are not used to form a chemical bonded part but to truly fuse parts.  The other critical advancement, HP developed a detailing agent (jetted in the same one pass) that stops the fusing process to limit thermal bleed.   Basically, the MJF process spreads powder in a thin layer, the fusing agent is laid down by HP’s patented print heads, an intense infrared light system activates the fusing agents to fuse the nylon plastic together.  With the detailing agent helping to create a crisp and definitive feature by stopping the fusing process.  The system prints one layer, one pass at a time to form very detailed and dense parts with no speed degradation no matter the volume of parts printed. 

This process also produces truly isotropic parts which means the part is as strong in the x and y as it is in the z. This jetting of fusing agents is ground breaking enough but when you look at the size of the print bed you will see that volume is another game changer.  The bed size of 13 inches in the x, 11.5 in the y and 15 inches in the z gives you a large volume to use. The print speed is approximately 1 inch per hour which allows fast complete builds.  Hundreds of parts can be produced all at the same time with precision accuracy – often this is 10-20X faster than previous technologies.  But that’s not all: HP recently introduced a new printer to their lineup that has the ability to print with a cpk level of 1.33 with an I.T. scale of 13. What does that mean? It means parts printed on an Hp 3D printer are equivalent to parts coming off soft steel injection mold tooling. 

Wow, that’s game changing.

Topics: 3D Printing