SHOP
Mark Blumreiter

Mark Blumreiter


Recent posts by Mark Blumreiter

2 min read

How to Minimize Warpage in HP MJF Parts

By Mark Blumreiter on Mar 6, 2020 11:19:36 AM

The HP Multi Jet Fusion (MJF) printing process is similar to injection molding in a few ways. MJF and molding are both heat-based processes that melt raw plastic to form the final part shape. Because of this, there are similarities in how to properly design and prepare a part for each manufacturing process.

Just like injection molding, we want to control the heating and cooling in MJF printing to ensure good part quality. The MJF process uses a combination of lamps and thermal cameras to do this. By monitoring and controlling the heating/fusing and cooling process we can prevent or minimize defects like warpage.

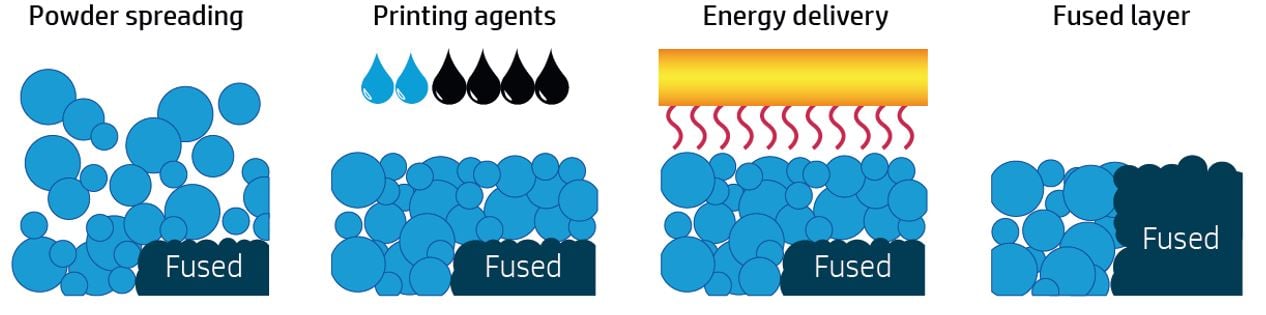
Figure 1: HP MJF Printing Process

MJF Printing Process

Warpage

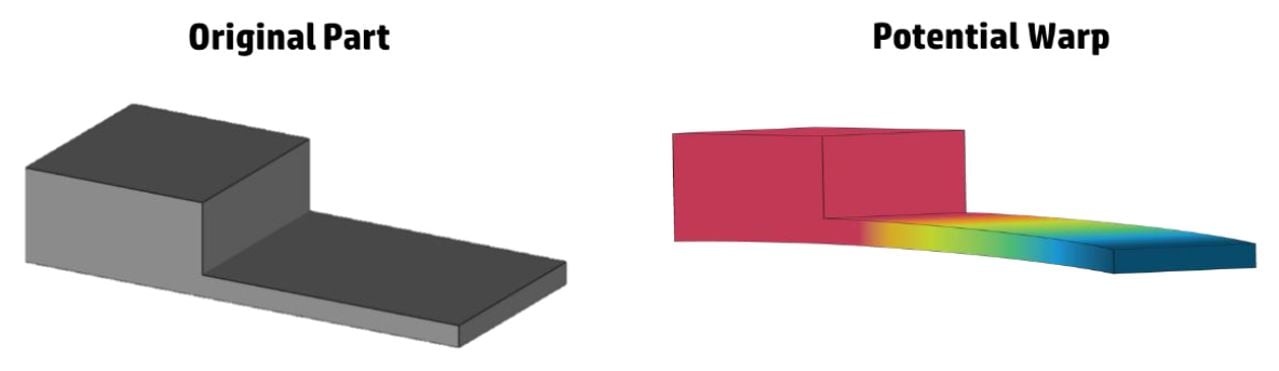
Warpage is a possible defect in any polymer process that involves heat. Warpage is especially common in long, thin, flat parts. (aspect ratio greater than 10:1) When plastic cools from molten to solid, it contracts to take up less space. When one area of a large flat part cools before another area, it can “pull” the part towards it. With small compact parts (as opposed to long thin parts) it is much easier to control the cooling and prevent warpage.

warpage b

For large, thin, flat parts, we recommend placing the parts parallel to the X-Y plane. This causes the part to melt and cool at a consistent rate. To further prevent warpage, align the length of the part in the Y-axis. The lamp carriage moves in the X-axis, so it will fuse the entire part at once when it move across. Along these same lines, try to avoid fast cooling if warpage is an issue. This allows the parts to naturally cool while they’re “held in place” by the surrounding powder.

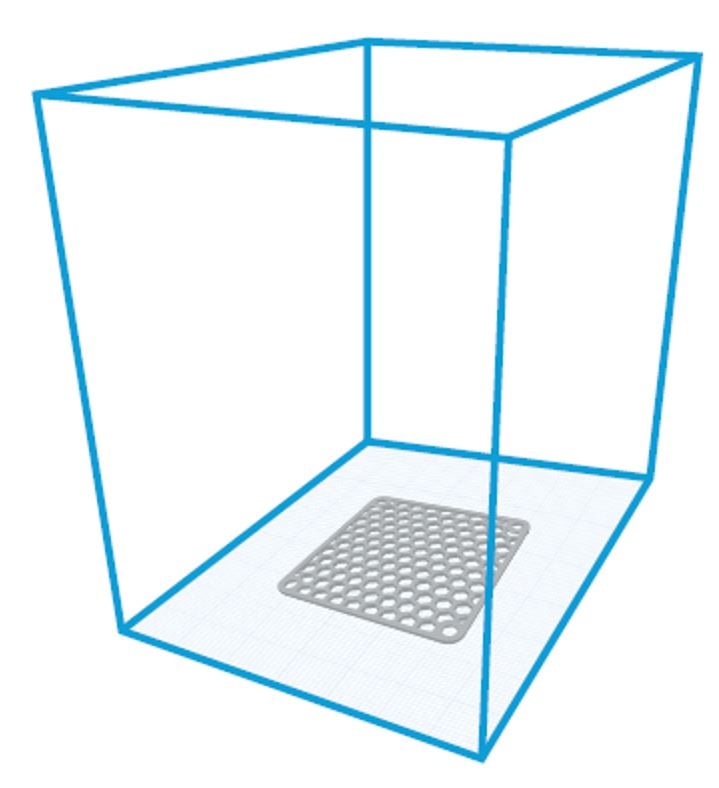
Parts placed in the center of the build volume towards the bottom will be the least prone to warpage. This is because it will cool the most uniformly (from the outside in)

Figure 2: Avoid warpage by placing parts flat in the center-bottom of the build area

build

Design Changes

If that still doesn’t work, we have a few more options. One, we could print other parts, or even sacrificial parts, surrounding this large one. This, in effect, cages in the bigger part to hold the heat in and also slows down the cooling so it’s nice and uniform. Just like injection molding, we can’t let one area cool faster than another or it will warp. The other option is to add some ribs or supporting geometry to your part to prevent warping. Depending on your application this may or may not be possible. You can design in support bars to keep a part aligned while it cools, then snip the alignment bars off. This is similar to trimming the plastic from the gate in a molding process.

Material Considerations

PA11 will be most susceptible to warpage. If flatness is a major concern, we recommend using PA12 or PA12 with glass beads. If PA11 is necessary, use the Fast print mode. Regardless of which material is used, the HP MJF parts are usually flexible enough to easily be re-shaped or pushed into their final mounting position.

Keep these best practices in mind when designing and preparing your MJF prints, and you should be able to eliminate or at least minimize warpage in your parts.

Topics: 3D Printing

How the HP Multi Jet Fusion 4200 Works

By Mark Blumreiter on Nov 13, 2019 11:55:38 AM

MasterGraphics Additive Manufacturing Engineer, Mark Blumreiter explains how the MJF works and how this technology is different from other similar 3D Printer technologies.

Topics: 3D Printing
1 min read

3D Printed Robotic Arm Grippers

By Mark Blumreiter on Nov 12, 2019 1:16:43 PM


The final application we’ll look at for fiber reinforced 3d printed parts is robotic arm grippers. Any tool at the end of a robotic arm benefits from being lightweight because it requires less energy to move the arm. The grippers also need to be strong and stiff enough to handle the stresses involved with lifting, assembling, or machining the component. Depending on the part that’s being gripped, the grippers sometimes require unique geometry. For these reasons, 3D printed fiber reinforced are the perfect solution.

A U.S. based fittings and valves manufacturer fully embraced the Markforged 3D print technology in their shop. Their engineers used to spend days or weeks tooling up a robotic work cell with custom machined grippers and fittings. Now they can re-tool the robot grippers in less than 24 hours.

End of Arm Gripper

robotic end of arm gripper


Topics: 3D Printing
1 min read

3D Printed End-of-Arm Vacuum Tooling

By Mark Blumreiter on Nov 12, 2019 1:04:57 PM


Another great example of reinforced 3D printed parts on the shop floor is end-of-arm vacuum tooling. When lightweight, flat parts need to be moved around and assembled, it’s common to use vacuum tooling to use air and suction parts to hold and move them. The image below shows a blue tube that is pulling air through the black tool. This creates the suction necessary to lift and move these lightweight parts.

3D printed end of arm tooling

There are a handful of properties these vacuum tools can require that 3D printing excels at. First, the tool should be lightweight because it is attached to the end of a robotic arm. Second the air suction needs to be routed through internal channels to provide suction at multiple locations. Finally, the tool needs to fit a unique contour of the part it’s picking up. Fiber reinforced 3D printed parts are the perfect solution for strong, stiff, lightweight, custom geometry vacuum tooling.

Keep in mind, these vacuum tools are typically only needed in very low quantities (1-10 parts) which is perfect for additive manufacturing. There’s no need to book time on a CNC mill and fixture an aluminum block for machining. This makes it much quicker to iterate new designs as well.

Using data from another Markforged case study, these numbers show the difference between aluminum and fiber reinforced vacuum tooling.

Part Comparison

vacuum tooling


Topics: 3D Printing
1 min read

CMM Fixtures

By Mark Blumreiter on Nov 12, 2019 12:53:55 PM


CMM fixtures are used to hold parts in place as they are being measured by a CMM. These measurements help ensure the manufacturing process is working as planned, and parts are meeting their dimensional specs. The traditional way parts are held in place for measurement is a combination of clamps, posts, and stops. But with composite reinforced 3D printed fixtures, we can create a lightweight, sturdy, more functional fixture suited precisely for your part.

The below graphic shows real data is from a Markforged case study regarding a US aerospace company.

CMM-1

The reason these time and cost savings could be realized in the first place was because the 3D printed CMM fixture actually worked. This can’t be said for all 3D printed parts. In fact, many other 3DP materials would not meet the strength and stiffness requirements while still providing the cost savings. The Markforged fiber reinforced Onyx parts also provided a non-marring surface for the aerospace components to sit in. This helped prevent the occasional scratched part.

Engineers at this aerospace company had been looking for ways to avoid bottlenecks like CMM fixtures. Once they discovered the fiber reinforced 3D printed parts as a functional, cost effective alternative, they haven’t looked back.


Topics: 3D Printing
1 min read

3D Printed Carbon Fiber on the Shop Floor

By Mark Blumreiter on Nov 12, 2019 11:46:39 AM

3d parts on the shop floor

In the past few years, composite 3D printing has officially hit the main stage. Companies like Markforged, EnvisionTEC, Cosine, and 3Dynamics are looking beyond traditional plastic extrusion machine capabilities and incorporating new materials such as carbon fiber, Kevlar, fiberglass, and ceramics. Combining these traditional fiber and ceramic materials with a proven additive technology creates a reliable and cost effective way to 3D print strong, durable parts for the shop floor.

The primary applications for fiber reinforced 3D printed parts on the shop floor include fixtures, jigs, tooling, and grippers; all of which can benefit from complex geometry and lightweight designs. This is where additive manufacturing excels. Anyone who is familiar with 3D printers knows that complexity is free.

The freedom to explore new design choices and 3D print truly functional parts for the shop floor can be a big time and money saver. Let’s look at a real world examples, 

Ready to get started printing on your shop floor? Lease a Markforged Mark Two for $449 per month.
Topics: 3D Printing
1 min read

Where can I buy the HP 3D Printer?

By Mark Blumreiter on Oct 1, 2019 2:47:32 PM

HP’s new Multi Jet Fusion 3D printers are available through HP’s extensive partner network, sometimes called Resellers. The benefits to using a reseller network are not always clear, and there can be some confusion as to where the reseller fits in.

Similar to other large OEMs, HP specializes in the design and manufacturing of their technology, and leaves the sales, installation, training, and service to local experts. At MasterGraphics, we are one of those local experts.

Every market is different. Industries can be heavily located in one region over another. A local team of salesman and engineers typically has a much better understanding of their own regions. Take for example medical devices in Minnesota, or the automotive industry in Detroit. Having an understanding of the products, companies, and general “way of business” in your region is hugely beneficial throughout the sales process. Plus it cuts down on travel time and remote communication, allowing more face to face and on-site visits.

The sales, training, and service are all performed by a local team of experts. HP’s machines have next business day service, which is only possible because of the trained technicians in every state (or country) Since HP is a worldwide company, it would not be practical for HP to train and hire technicians in every location a machine is installed. The entire process of install and training can take up to a week, followed by extra training or troubleshooting, on an as-need basis. Once again, this is all possible because of the local engineers and technicians.

Many times, we speak with companies to insist on working only directly with the OEM. While this may work in other industries, it is not practical in the professional additive machine market. As mentioned, companies like HP do not have the local resources in every possible region. The HP MJF 3D printers are complex machines that require serious effort and education to run smoothly and cost effectively. This is only made possible by the local presence of certified partners in each region.

Orders are processed and fulfilled by the local reseller, but regional HP managers stay involved throughout sales processes. As a reseller, we stay in constant communication with managers and engineers from HP to stay up to date on the latest technical advancements, pricing, promotions, and future outlook of HP additive technology.

Topics: 3D Printing
3 min read

How much does the HP 3D printer cost?

By Mark Blumreiter on Sep 12, 2019 11:12:37 AM

HP released their Multi-Jet Fusion technology about 4 years ago and have shipped a handful of machine configurations. These various machine configurations come with different hardware price tags, operating costs, and yearly maintenance costs. It can be overwhelming for someone new to the technology, or who needs a “ballpark” price range.

The goal of this article is to provide a high level overview of the costs associated with HP’s Multi Jet Fusion 3D printers. There are three families of machines that we’ll look at.

Printer Family #1 – HP 300 / 500 Series

HP has 4 machines in their 300 / 500 series lineup. The printer functionalities differ by two variables – build volume and color capabilities.

HP 340:  White parts only              10 x 7.5 x 9.8 inch build volume

HP 380:  Color parts                         10 x 7.5 x 9.8 inch build volume

HP 540:  White parts only              13.1 x 7.5 x 9.8 inch build volume

HP 580:  Color parts                         13.1 x 7.5 x 9.8 inch build volume

The cost range of hardware across these machines is $57,000 - $110,000, with the HP 340 at the low end and the HP 580 at the high end.

The variable operating costs across the 300/500 series are all the same. We classify “variable costs” as all the consumables required for a build; powder, agents, cleaning roll, lamps, and filters.  The variable cost per cubic inch of printed part ranges from $4 to $8 depending on build height and packing density. A tall build with a high packing density has a lower $/in3 than a short build with low packing density.

The yearly maintenance ranges from $10,000 - $15,000 per year. This includes remote problem diagnosis and support, onsite hardware support with all parts and labor included, and all firmware updates.

Printer Family #2 – HP 4200 Series

The original line of machines HP released is the 4200 series, which includes the HP 4200, HP 4210, and HP 4210B. Each of these machines has the same printer capabilities and specifications. The primary difference is in the material delivery method.

The HP 4200 uses 300L boxes of powder, while the HP 4210B uses large 1400L bins to deliver the powder. The reason this is important is that the cost of consumables is lower on the HP 4210B, which accepts material in bulk. (Similar to an HP paper printer, where small ink cartridges are priced higher on a per unit basis than industrial printers buying ink in bulk)

The hardware price range for the 4200 series is $270,000 - $430,000. Because this is a higher end machine than the 300/500 series, your cost to print is less expensive. The 4200 series can achieve $2 - $4 per cubic inch of printed part. Once again, this includes all variable costs such as powder, agents, filters, lamps, and cleaning rolls. The yearly maintenance is dependent on the exact hardware configuration (number of build units, printers, and processing stations), but typically runs between $35,000 and $43,000 per year. Remember, this includes remote diagnosis and support, next business day on site repair, and all updates.

Printer Family #3 – HP 5200 Series

The HP 5200 series of machines is the latest advancements in HP’s Multi Jet Fusion technology. These machines are aimed at true production work. The hardware costs are higher, but the reliability, accuracy, and low cost per part are unrivaled in the industry.

The 5200 machine ranges from $350,000 to $500,000. With optimized builds, we can achieve a cost per cubic inch under $1 including all variable costs. The yearly maintenance for this high end production printer is $35,000 - $53,000.

Conclusion

The Multi Jet Fusion additive technology from HP is raising the bar for both prototyping and production 3D printing. Whatever the needs are, HP likely has a solution whether it be an R&D lab, a university, a tool room, or a production line. The machines with a lower up front hardware investment typically have a higher cost of operation. Conversely, the higher cost machines will have a much lower cost of operation for higher quantity production runs.

For specific pricing details or information, get in touch with one of our additive manufacturing experts.

Topics: 3D Printing
3 min read

HP Multi Jet Fusion 5200: Predictable Manufacturing

By Mark Blumreiter on Sep 6, 2019 12:52:00 PM

A manufacturing process needs to be predictable if it is to be trusted with “money making” parts. True manufacturing has stricter requirements than prototyping in terms of predictability. This is one (of many) reasons 3D printing has struggled to break into the production space. HP’s new MJF 5200 3D printer is a new and improved version of their MJF 4200, which launched about 3 years ago. Most of the improvements in the 5200 are directly targeting production work by addressing print speed, part cost, part quality, and machine reliability.

This article takes a look at how the HP MJF 5200 improves on both part quality and machine reliability to achieve greater manufacturing predictability. When we say “part quality”, we are referring to all aspects of the final printed part; accuracy, repeatability, surface finish, strength, uniformity. When we say “machine reliability”, we are referring to the printer itself. How will one build differ from the next? How often will it break down or have a failed build? Can the machine be relied on 24/7/365 to sustain a business?

Improvements in Part Quality
The HP 5200 can achieve IT=13 tolerances (accuracy) with a CpK of 1.33 (repeatability). This is comparable to soft mold tooling.

These improvements primarily come from HP’s new “Process Control Software”. The new software takes into account machine specific parameters when processing the build file. It uses calibration data specific to the printer to scale and compensate part geometry accordingly. The 5200 now processes and “slices” the build file internally, instead of with external “one size fits all” software.

The HP 5200 also has a much higher resolution thermal camera and a greater number of heating lamps, both of which are located centrally above the build volume on the hood of the printer. After each layer the camera takes a thermal snapshot of the surface temperature. It uses this as feedback for the lamps to deliver the proper amount of energy to each specific “heating zone”. The HP 5200 has 5120 pixel thermal camera resolution vs. 992 pixel resolution on the HP 4200 (5x improvement). This gives the printer the ability to detect more minute temperature variations.

The thermal camera is surrounded by 22 heating lamps with 14 distinct control zones (The HP 4200 only has 20 lamps with 12 control zones) This increased lamp and zone number tie in with the improved thermal camera resolution to carefully control the surface temperature of the build, layer-by-layer.

The MJF process is driven by temperature control and the amount of energy required to melt powder. This is why these improvements are so critical to achieving better tolerances and repeatable builds.

Improvements in Machine Reliability

When a machine goes down in a production environment, it is immediately costing the company money by not producing. The HP MJF 5200 has multiple design changes to improve overall reliability.

A third fusing lamp was added for redundancy. Only two are required at any time. If a lamp dies mid-print, the 3rd lamp kicks in immediately and the build continues. Once the print is complete, the dead lamp needs to be replaced.

The heating lamps are also higher powered lamps. During normal operation, these are now running around 50% power, as opposed to near 100%. This allows more throttle-up and throttle down capability, and less on/off operation. This extends the overall life of the heating lamps.

Temperature control is a critical aspect in the Multi-Jet Fusion process. Because of this, the printer’s surrounding environment can play a role in build-to-build consistency. The 5200 printer has improved seals, fans, and sensors to prevent pressure/suction variations in the environment impacting the airflow and powder internally. The incoming air is also preheated to 40°C to further reduce potential failures or variability.

Finally, one area of manufacturing predictability we haven’t touched on, and may be the most important, is the cost of manufacturing.  The HP 5200 improvements in hardware and software lead to a more accurate picture of overall cost. Software can track consumable usage (variable costs) and the reliable machine can predictably build in the cost of maintenance items and service contracts (fixed costs) into your process.

The HP Multi-Jet Fusion 5200 3D printer is the latest advancement in additive manufacturing. It’s a great push in the right direction towards true production 3D printing. These improvements in part quality, machine reliability, and predictable cost structures will certainly open up more applications to use this technology.

Topics: 3D Printing