SHOP
1 min read

Cracking the Additive Manufacturing code

By Kevin Carr on May 27, 2022 11:29:39 AM

If you’re like most businesses, you’ve got numerous questions about additive manufacturing—perhaps even a few misconceptions, too. You’re wondering: 

  • Why should I be excited about adopting additive manufacturing?
  • Can it really provide a competitive advantage?
  • How would it help solve my customer challenges?
  • What if it doesn’t work for me?

We created this webinar to answer these questions and many more.  

In the first of our three-panel discussions, you’ll hear from additive manufacturing leaders who will answer these questions and MORE—all from their own experience. How they started. What they learned. What mistakes to avoid.
You’ll hear from:

  • Peter Koostra, Director of Engineering, RE3DTECH
  • Kevin Carr, President, MasterGraphics
  • David Rosendahl, President, MindFire Inc., Moderator


Watch the webinar recording now to gain insights into:  

  • The unexpected reasons organizations are adopting additive manufacturing for a competitive advantage
  • How companies start their additive journey (often through diversification), and the surprising lessons learned along the way
  • Which approach to additive manufacturing doesn’t work
  • Answers to questions that our webinar attendees had about expanding solutions to customers’ challenges 


Topics: 3D Printing Additive Manufacturing jigs & fixtures SLA Metal Metal 3D Printing HP Sinterit SLS MJF
3 min read

Important part of additive manufacturing is Post Processing - Options for MJF and SLS 3D Print Technologies

By Barbara Miller-Webb on Apr 25, 2022 1:53:50 PM

Whatever the 3D print technique is, some kind of post-processing will be needed to make the part complete. Whether it be removing supports, using ultraviolet light to make a part strong, removing excess powder, or making a part smoother. I would like to review the optimal methods that MJF and SLS printing use to complete the Additive Manufacturing process. The methods (especially those automated) can increase productivity, create higher cost-efficiency, improve component performance, and faster implementation.  

After the unpacking process, the first step in post-processing is CLEANING, removing the excess powder in MJF/SLS printing. 

Media blasting systems need significant airflow to work properly to remove the unsintered loose powder, which can be accomplished with a sandblaster. 

There is an extensive list of sandblasters that are on the market and these machines can be classified into four categories:

  • Benchtop media blasters
  • Floor top media blasters
  • Tumbling blast cabinets
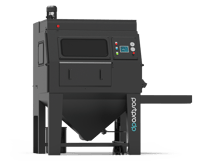
  • SLS/MJF-specific depowdering blast cabinets

Benchtop blasters are recommended for users on a budget, typically with small to medium-sized print volumes and pricing up to around $1,000.  

Floor top blasters are generally over $1,000 and offer a larger working space and are considered industrial quality.

postpro_dp

Tumbling blasters are an automated blasting process and contain a rotating drum with a blasting gun pointed at the SLS parts inside the drum. Parts are placed in the machine and left alone until the blasting cycle is complete.

SLS/MJF-specific media blasters exist at the same high-end spectrum as the tumble blasters. These are completely automated solutions for removing powder from parts, these blasters are more expensive but are market leaders for heavy SLS/MJF use cases. The cycle times are about 10 minutes to fully depowder parts.

AMT's PostPro SF50Additional processing steps can be done beyond the media blasting process and some users may want to deploy vapor smoothing. Vapor smoothing is a finishing option for SLS/MJF/FDM printed parts that use vaporized chemical solvents to create shiny, smooth surfaces. Vapor smoothing can be used in various 3D printing technologies such as powder bed fusion, including SLS and MJF, as well as Fused Deposition Modelling (FDM). Vapor smoothing is a smoothed printed part that also retains its original mechanical properties.  

Once parts are cleaned, users may want to change their color, two popular methods are spray painting and dyeing.

Steps for spray painting SLS/MJF parts are similar to that of other 3D printed parts. First, parts should be covered in multiple thin layers of primer. Then apply the spray paint to the surface of the part.

Dyeing parts can be done manually in an 80-100°C dye bath or an automated dying machine, such as Omegasonics 1818 Dye Tank which has a dual action high-velocity circulation system moving the heated dye material, through the SLS/MJF parts that might have hard to reach areas, blind holes, moving parts, hinges, and internal crevices, that can't be touched with paint. A lot of times, SLS/MJF parts are dyed and not painted because they can be complex geometries.  

Traditional methods are slow, difficult to predict consistency, and can account for up to 60% of the part cost. 

If you want to discuss a market leader, AMT Technologies, that offers automated post-processing solutions, please reach out to me via email at barbara.miller-webb@mastergraphics.com

Topics: 3D Printing Post-Processing SLS MJF
5 min read

Sinterit Lisa X vs Formlabs Fuse 1

By Kevin Carr on Mar 28, 2022 1:59:57 PM


Affordable SLS Face-Off

Full disclosure that I run a business that resells Sinterit 3D printers, however, know going into this at the end both systems earn high praise.  The reason I wanted to write this is that I believe both these systems are revolutionary and open 3D print applications that until their introductions were not obtainable without 100K plus in investment.  When you figure in all the needed support solutions for these SLS printers, the price to fully implement both these systems are around 30-35K.

The FUSE 1 printer is $18,499 and Lisa X $21,900 however, this is before adding post-processing equipment, material management solutions, etc... Know going into this, that you will need the right workflow to effectively implement the printers.  It also must be noted that the Lisa X was introduced in 2022 to expand Sinterit's portfolio from the Lisa Pro.

Sinterit states the Lisa X is 10X faster than the Lisa Pro.

Whether you are a prototype shop, manufacturing support, or product development, SLS at this price is game-changing. 

                   Fuse 1                                                                          Lisa X

     fuse1                                 Lisa X

First note — both use Selective Laser Sintering (SLS) technology.  SLS is an additive manufacturing (AM) technology that uses a high-power laser to sinter small particles of polymer powder into a solid structure based on a 3D model. SLS 3D printing has been a popular choice for engineers and manufacturers for decades.  Low cost per part, high productivity, and established materials make the technology ideal for a range of applications from rapid prototyping to small-batch, bridge, or custom manufacturing.

Until the launch of these products, if you needed strong parts at a lower investment point most users leveraged Fused Deposition Modeling (FDM) or Fused Filament Fabrication (FFF).  The advantage of SLS is in most cases the printing is faster, the parts are stronger isotopically.  Additionally, the SLS printing process most notably discards the need for support material (as there is unsintered powder all around the object being printed) facilitating the creation of complex and interlocking forms and allowing the packing of parts in a print "box" to increase throughput 10-20X faster than FDM/FFF.  There are of course high-end FDM machines that increase speed but when comparable price points, these units bring capability in-house never attainable before.

Comparison 1: Build Chamber Size
Lisa X: 13" x 7.1" x 5.1"
Fuse 1: 11.8" x 6.5" x 6.5"
Overall, build volume very similar

Comparison 2: Materials
Lisa X: 9 materials - variations of nylon (11 & 12), TPE, and TPU, ESD powder
Fuse 1: 2 materials - Nylon 12 and Nylon 11
Lisa X has a wider range of materials — however, the Fuse runs the most common SLS materials. One additional note, Lisa X has the ability to hook up gas to improve the output of materials such as PA11.

Comparison 3: Price
Lisa X: $21,900
Fuse 1: $18,499
As mentioned above, once you add the needed support equipment both systems range between 30-35K

Comparison 4: Speed
Lisa X: Full Build at 11% Density — est. 35 hours (with cooling)
Fuse 1: Full Build at 11% Density — est. 49 hours (with cooling) 
Lisa X excels and can be upwards of 30% faster.  When you increase your pack density the difference becomes greater.  The real note, is the speeds 10-20X times faster than tabletop FDM/FFF printers.

Comparision 5: Print quality — PA12
Lisa X: Very good quality SLS parts with nice surface finish, strong thin walls.
Fuse 1: Very good quality SLS parts with very good mini hole features.
Once again, both systems offer a high-quality part for the price point and nice output.  A true step up from FDM/FFF.

           fuse1part                         Lisaxpart
                     Fuse 1 Part                                                        Lisa X Part

Comparison 6: Part Cost PA12
Lisa X:  $ 150kg
Fuse 1: $ 100kg

The Lisa X is more expensive for material but due to its higher refresh ratio, the operating cost for both systems is similar.  The Lisa X is an open system so you have more flexibility to use different media to possibly reduce your cost.

In the end, they are both viable and very good systems.  If you are running multiple desktop FDM units and/or outsourcing SLS parts, this could be your ticket to a faster turnaround time.  I would also assume reduce your overall cost as well. There are some additional differences so I encourage you to do your research more and for Lisa X we can certainly help you understand its strengths and weaknesses better.

These are game-changing — take the time to look closer. 

If you want more information on the unit, feel free to visit us at www.mastergraphics.com or contact me directly at kevin.carr@mastergraphics.com


Topics: 3D Printing Sinterit Comparison - 3D SLS